It surprised me to discover that despite having created many free beading resources already we hadn’t yet created one that focuses on basic Peyote Stitch. So I decided with International Beading Week just around the corner this would be the perfect time to show you how to make an even count peyote stitch ring. This is the perfect beginners project as it’s small scale and quick to create. By the time you’ve made one ring you’ll be feeling confident with this stitch.

Materials
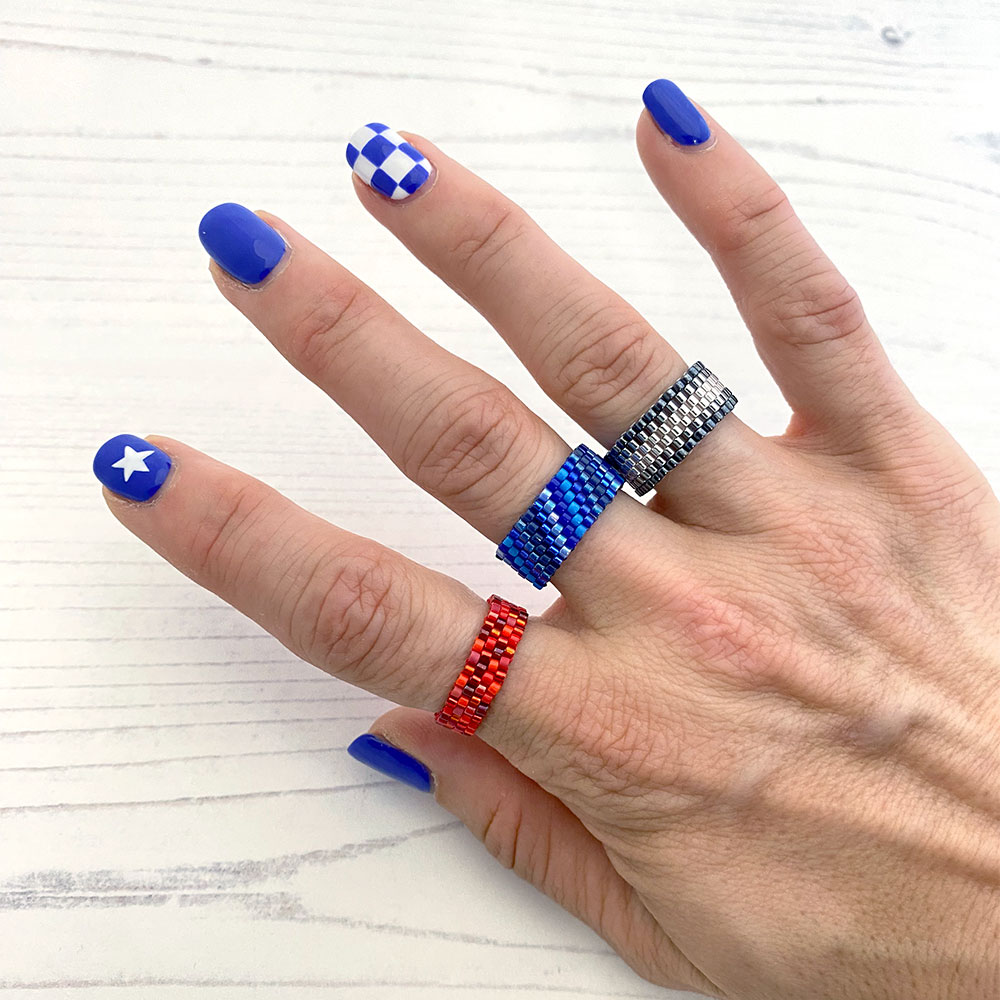
You’ll need size 11 Miyuki Delica Beads, just 1-2g are required (depending on the designs and size of your ring). We stock a wide range of mixes which are perfect for small projects like this. The ring example above were all made from mixes (Red, Blue & Winter).
Beading thread. For a beginner project we would recommend Miyuki thread, SoNo, or KO. You’ll need approximately 1.5m.
A size 10 beading needle.
You’ll also find a bead mat to stop your beads rolling away very helpful.
Getting started
The first 2 rows are created at the same time in Peyote stitch during the set up stage. It can be a little fiddly, but it gets much easier once you’ve added your third and forth row.
For these rings, I would suggest keeping them to 4 or 6 beads wide, if you go much wider they’ll get harder to push over your knuckle. The “Even Count” part of this stitch refers to the width of the beading and the even number of beads used.
This diagram shows how to start off the Silvery Ring design above.

Once you’ve got set up with rows 1 – 4. Continue in your chosen pattern repeating rows 3 & 4 until your ring is the right size.
You may find the two following videos helpful. The first shows Peyote stitch in a little more detail. The following video shows a trick for keeping your tension neat to produce a smooth beaded fabric.
Working to a pattern & designing your own ring
We’ve created a downloadable PDF which you can print off and colour in to help create your own designs. It also has diagrams of the rings featured in this project. The red ring has been created with the Red Miyuki Delica Bead Mix, with beads selected at random which makes it easier if you haven’t done Peyote stitch before. The blue ring has been created from the Blue Miyuki Delica Bead Mix, using the different colours to create diagonal stripes. The Silvery ring has been created from our Wintery mix in vertical stripes which creates a very effective ring. You can make your own patterns as simple or complex as you like. You may find it useful to tick off the rows or beads as you go to help keep your place or use a post-it note to cover the rows you’ve completed.

Getting the fit right & joining the ends
Wrapping your beadwork around your finger is the best way to ensure a good fit. Do bear in mind that you need to be able to slide the ring over your knuckle too, which is often the widest part of your finger. You want the two ends to be be touching with no overlap. Then you can zip the ends together. Weave your thread back and forth loosely to begin with so you can see where you are going and then you can pull it tight at the end of the row. Fasten off each end of thread by weaving through several beads.
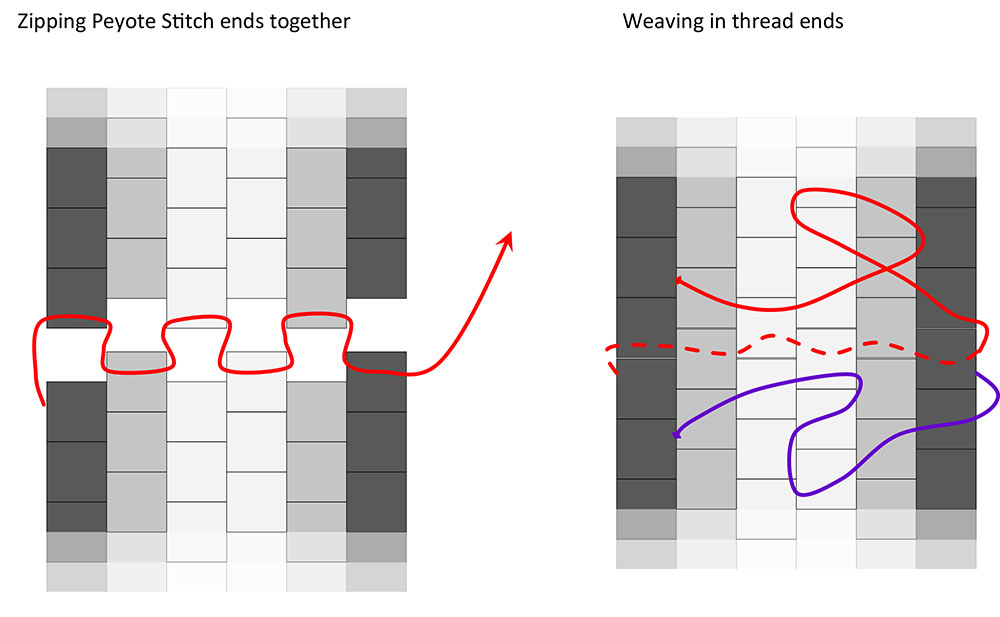
To secure the threads weave them in following the existing thread paths, so your thread isn’t visible, be careful not to skip over a bead. I like to change direction too, ensuring my thread is secure. Finish the thread by exiting out of a bead (not at the edge) so that when you cut the thread the end will be hidden inside a bead. Don’t try to thread through too many beads at once, or force through a gap that seems very tight. As you might break a bead (and you definitely want to avoid that). The red & purple threads on the diagram to the right shows an example of weaving in the ends.
What’s next…
Making larger scale items like bracelets are a great project to progress on to. We have several kits that help with this and show you how to add a clasp. Like our Zebra Bracelet kits or Deco Bracelet kits, each are available in a range of lovely colourways.