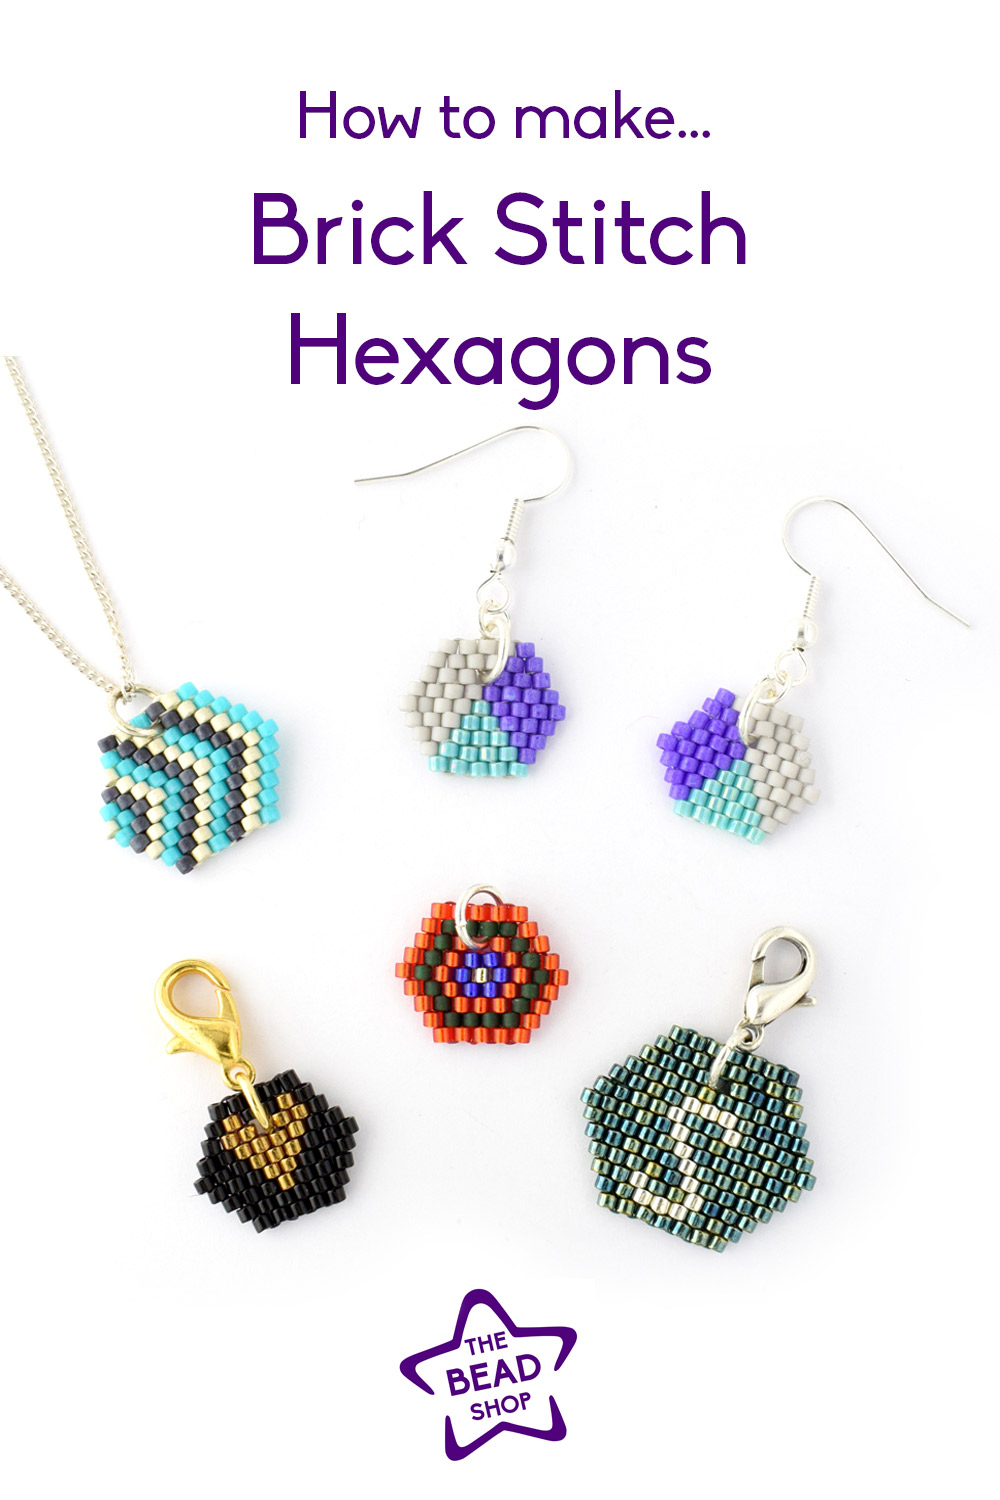
Learn how to use the bead-weaving technique of brick stitch to create a hexagon shape with our step-by-step tutorial.
Difficulty: Beginner (some previous bead-weaving would be helpful)
What you will make: A hexagon shape made out of Delica beads using a beading technique called brick stitch.
You will learn: How to get started, increase, decrease and incorporate a small gap in a row, perfect for hanging your bead work. This pattern creates horizontal stripes which is much easier to understand for beginners. Once you have understood the technique you can go on to create lots of different patterns!
Full pattern below, or download a printable pattern here.
Tools and Materials:
- Size 11 Delica beads – in multiple colours (our mixes work well).
- Size 10 beading needle
- Beading Thread
- 1 x 6mm jump ring
- Findings to hang your creation (earrings or a necklace chain)
How to make Brick Stitch Hexagons
Step 1
Cut a long but manageable piece of thread, (an arm stretch/1m is enough) and thread your needle. The first row of brick stitch is established with ladder stitch; pick up 2 beads, thread through the first bead again, towards the second bead (creating a loop, the beads should sit next to one another). Thread back down the second bead.
Step 2
Pick up a third bead and thread back down the second bead to join it onto the row. Thread back up the third bead and pick up a forth, join this to the row by going back up the third bead and down the forth.
(tip: keep your beads pinned flat to a bead mat to keep track of where you are). Pick up a fifth beads and attach this to the row by going down the forth and back up the fifth bead to complete the row.

Step 3
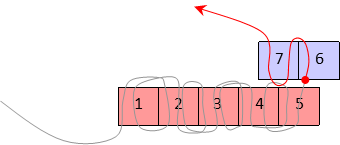
When starting a Brick stitch row you always pick up two beads, this will hide your thread neatly. Brick stitch is created by anchoring your bead under the thread then through the beads to keep them in place. (Increase row) Pick up 2 beads (6 & 7) take your needle under the thread that is between beads 4 & 5, then thread back up through bead 7. This will anchor the two beads in place at the end of the row. Notice how the beads over lap when then stack, giving them their “brick” name.
Step 4
Now that you have established the beginning of your first brick stitch row, you will continue just adding 1 bead at a time; pick up a new bead and take the thread underneath the thread between beads 3 and 4, and then back up the new bead (8).
Step 5
Pick up a 9th bead and anchor under the thread between beads 2 and 3 and thread back up through bead 9. Pick up a 10th bead and do the same again, anchoring under the bead between 1 and 2.
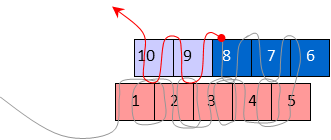
Step 6
Increase; Pick up an 11th bead and anchor under the thread between beads 1 and 2 (same as the 10th bead) and thread back up through bead 11. This finishes your second row of beading, you will see that the beads overhang on each side over the first row.

Step 7
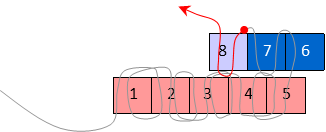
Row 3; working back along your bead work, pick up 2 new beads and anchor under the thread between beads 11 and 10.
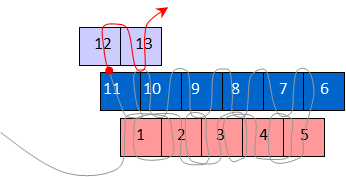
Step 8
Continue row 3; working in the same way as row 2 add beads 14 – 18 anchoring under the thread between the beads from the row below.
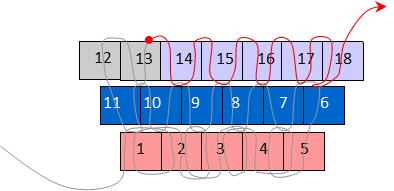
Step 9
Row 4; repeat step 7 and 8.
Step 10
Row 5; repeat step 7 and 8. This is the final increase row.

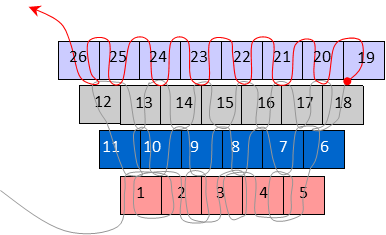
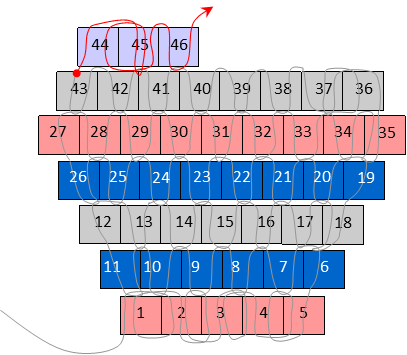
Step 11
Row 6 – decrease row. We still need to start this row with two beads to keep the thread hidden; pick up 2 new beads (36 & 37) and anchor under the thread in between beads 33 & 34, and go up through 37. To stabilise the bead 36 on the very end go down through 36 and back up 37, bringing the two bead neatly together (ladder stitch again).
Step 12
Row 6 – completing the row. Continue adding beads in the same way as previous rows. Stopping at bead 43, as you do not need to add an extra bead at the end.

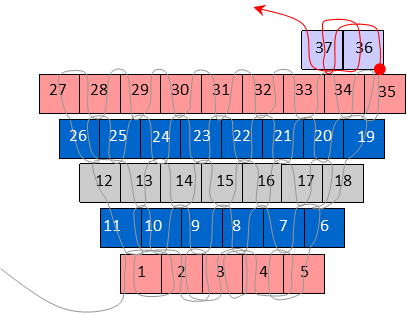
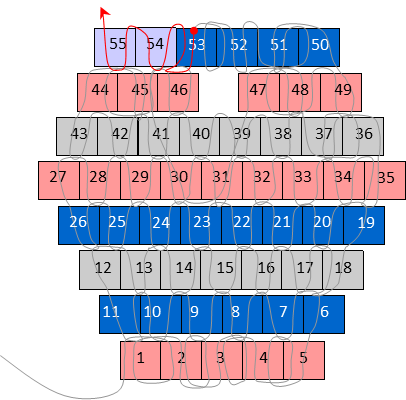
Step 13
Row 7 – repeat step 11 to start the row adding beads 44 and 45. Then add one more new bead as in step 12, pause here, we’ll be missing the next bead to create a gap in the row to add our jump ring later.
Step 14
Row 7 – second part – creating our gap; take the needle down through bead 45 then diagonally through 41 and 30, take it up diagonally through 31 and 39. Pick up 2 new beads (47 & 48) anchor under the thread between beads 38 and 37 below. Go up through 48 and stabilise 47 by going down it then back 48. Add one final bead on this row in the usual way.
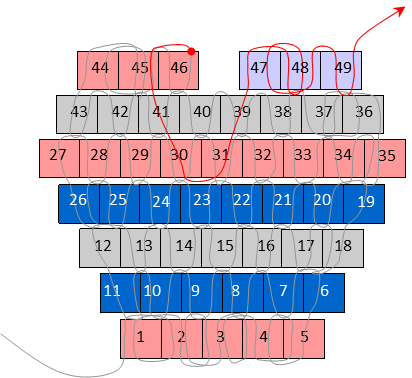
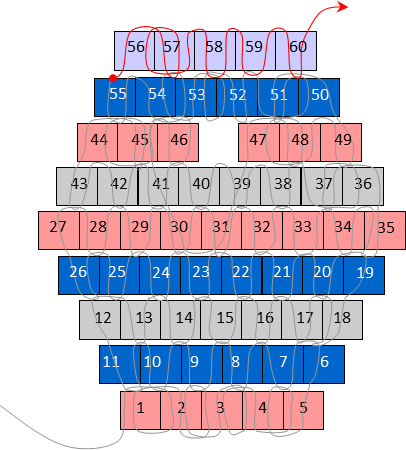
Step 15
Row 8 – Add beads 50, 51 and 52 in exactly the same way as step 13. Add bead 53 using ladder stitch; pick up 53 and go up through bead 52 again.
Step 16
Row 8 – To complete row 8 join bead 53 over the gap by going down bead 53 and anchor under the thread below (in between beads 45 and 46) the go back up through 53. Pick up a new bead (54) and also anchor under the same thread (between 46 & 45). Add the final bead of the row (55) in the usual way.
Step 17
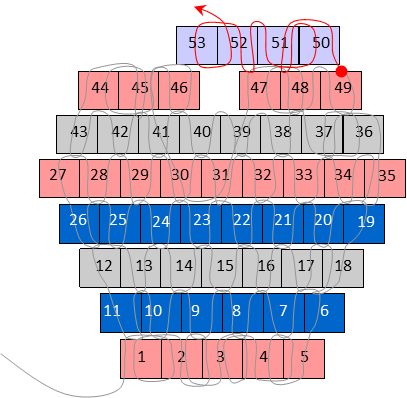
Row 9 – Work a decrease row in the same way as steps 11 and 12.
Step 18
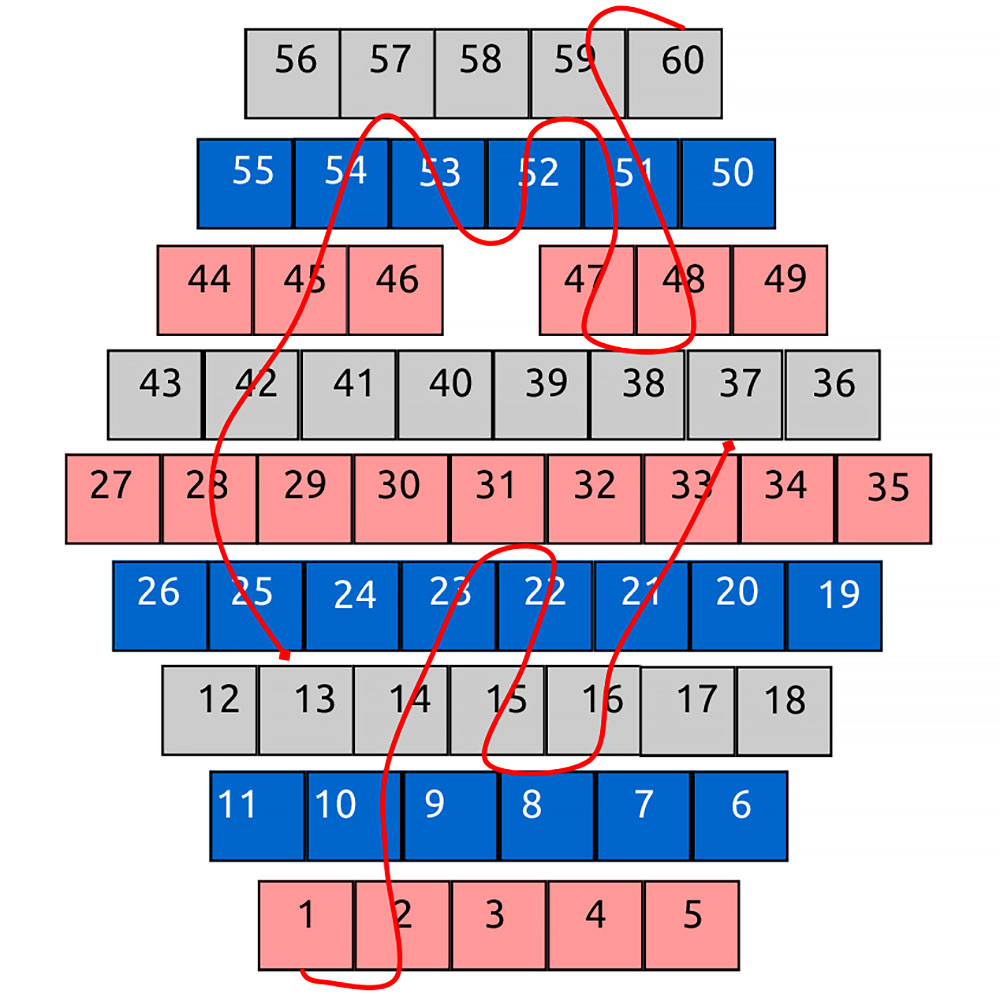
Now that your hexagon is complete, you just need to sew in the ends of your thread. It’s not essential that you do this in exactly the same way, as the diagram, but as long as your thread are secure it’ll be fine, there’s no need to tie knots either.
There are several templates for you to create your own brick stitch hexagons, just download the PDF version of this tutorial! Starting with stripes is a great way to get to grips with the process, however you can create many different shapes and designs within the small hexagons. Print out the templates and try colouring in different patterns.
These little hexagons also make brilliant earrings, charms and even beaded stitch markers. Share your make with us on The Bead Shop Facebook or Instagram pages, we love to see what you make!
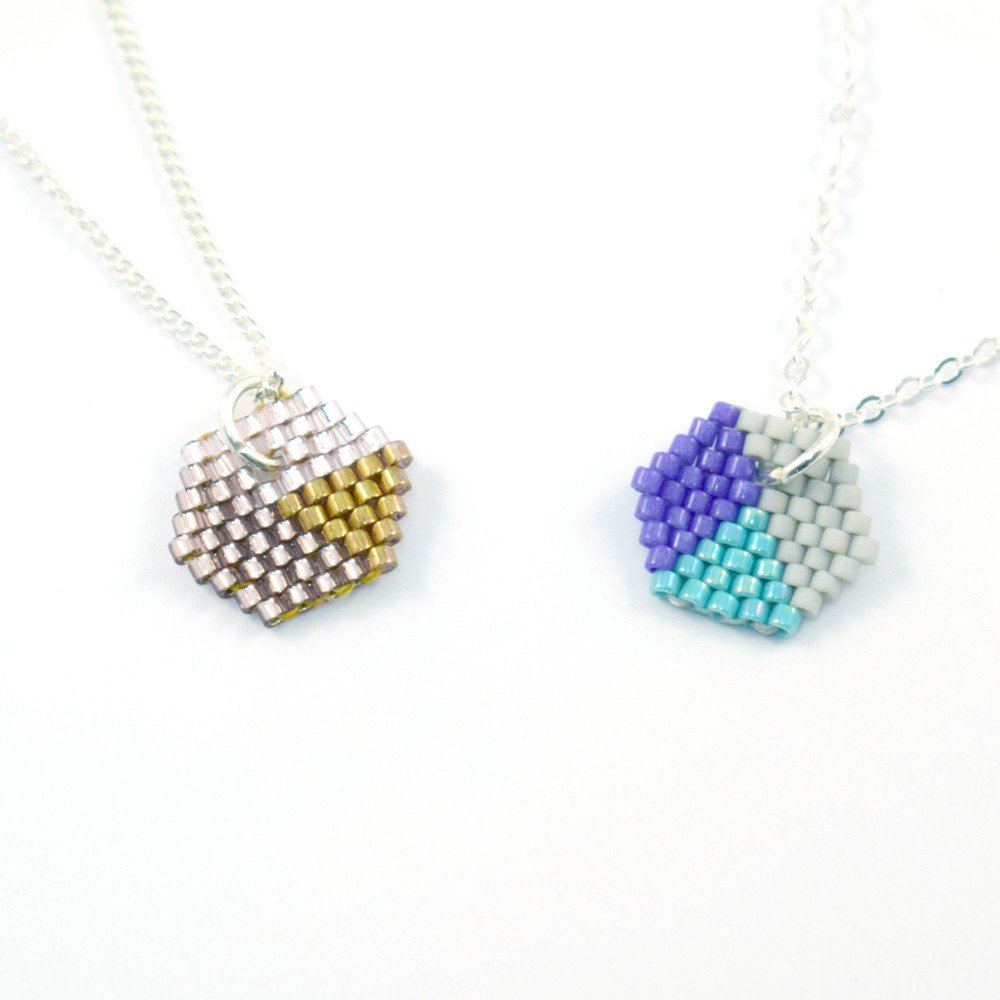
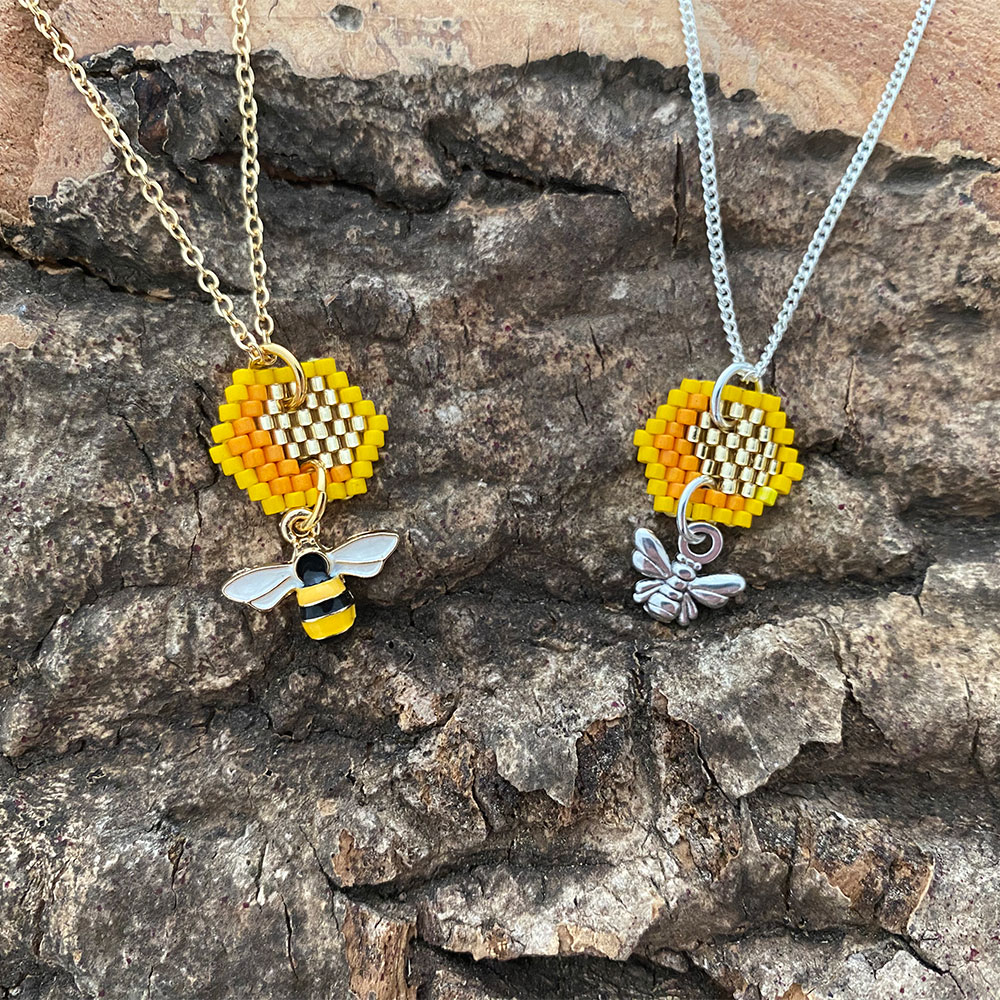
These pendants were created by creating two small holes as described in the instructions and the Miyuki Sunshine Delica Bead Mix. Jump rings were used to attach a bee charm to the bottom half and a readymade chain to the top.